Excel でカレンダーを作成するには、どうすればよいですか?
Excel カレンダーを使えば、誰かが新しい仕事を始める日や納品期限など、重要なイベントを簡単に把握できます。これらの日付が明確かつ一目で確認できるようになります。このガイドでは、Excel で月間および年間カレンダーを作成する方法をご紹介します。テンプレートを使った手軽な設定法と、細かいカスタマイズをしたい方向けのゼロからの作成法の両方を解説。これにより、仕事でもプライベートでも、しっかり整理されたスケジュール管理が実現できます。

Excel カレンダーテンプレートを使用して年間カレンダーを作成します
Excel カレンダーテンプレートを使用して年間カレンダーを作成します
この方法を使うには、コンピューターがネットワークに接続されていることを確認し、カレンダーテンプレートをダウンロードできるようにしてください。
1。まずは「ファイル」タブに移動し、左側のペインで「新規作成」ボタンをクリックしてください。その後、「カレンダー」を「おすすめの検索」から選択します。スクリーンショットを参照してください:
![[新規]ボタンをクリックし、[カレンダー]をクリック](http://cdn.extendoffice.com/images/stories/doc-excel/calendar/doc-create-calendar-new-02.png)
2。お気に入りのカレンダーテンプレートを1 つ選び、ダブルクリックして年間カレンダーを作成しましょう。

結果
Kutools for Excel を使って月間または年間カレンダーを素早く作成できます
永久カレンダーのKutools for Excelツールを使えば、新しいワークブックにカスタマイズされた月間または年間カレンダーを瞬時に作成でき、各月のカレンダーはそれぞれ新しいワークシートに配置されます。
Kutools for Excel をインストール後、「KUTOOLS PLUS > ワークシート > 永久カレンダー」をクリックしてください。表示される永久カレンダーダイアログボックスで、以下の操作を行ってください:
- 月間カレンダーを作成するには、開始および終了のドロップダウンリストで作成したい月を指定し、作成をクリックしてください。
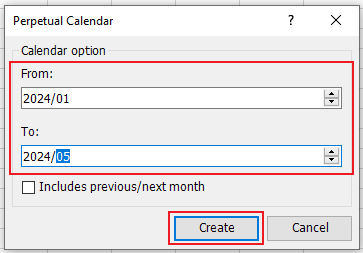
- 年間カレンダーを作成するには、開始および終了のドロップダウンリストでカレンダーを作成したい年を指定し、作成をクリックしてください。

結果
- 月間カレンダー:
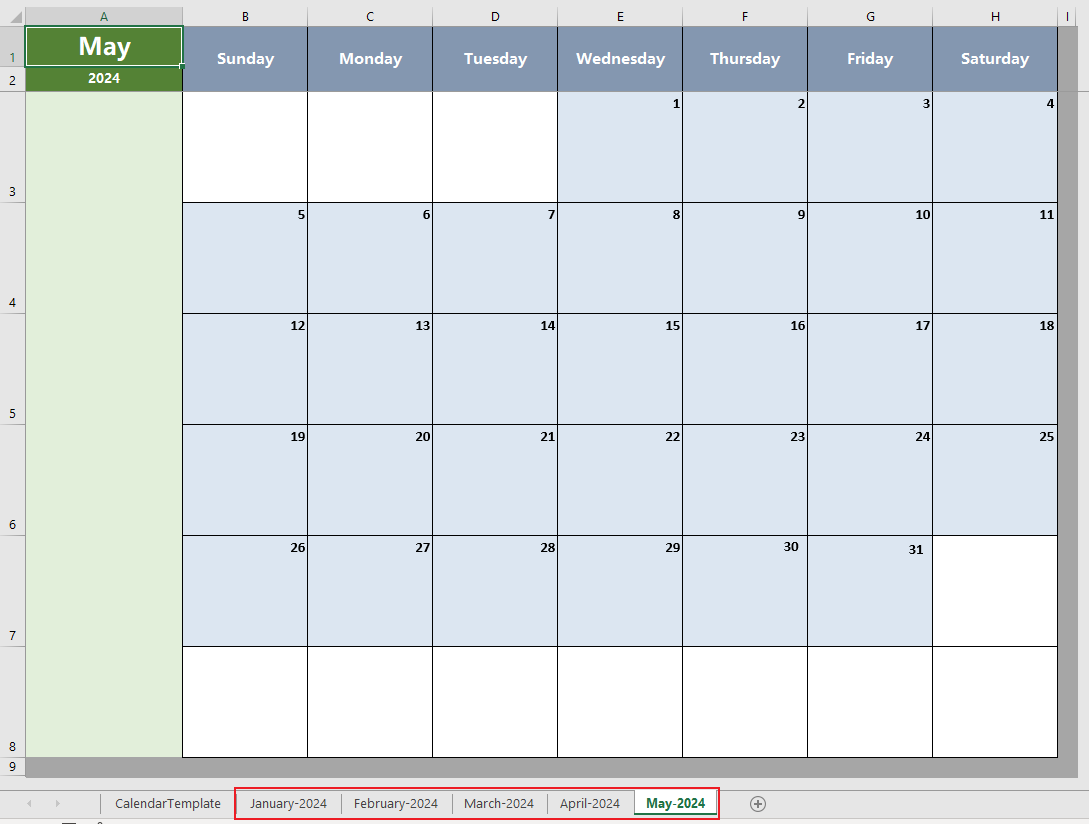
- 年間カレンダー:

VBA コードで月間カレンダーを作成します
次の VBA コードを使えば、月間カレンダーをスピーディに作成できます。以下の手順に従ってください:
1。Microsoft Visual Basic for Applications ウィンドウを開くには、「Alt+F11」キーを押してください。
2。新しいウィンドウが表示されたら、「挿入>標準モジュール」をクリックして、モジュールに以下のコードを入力します:
 Sub CalendarMaker()
ActiveSheet.Protect DrawingObjects:=False, Contents:=False, _
Scenarios:=False
Application.ScreenUpdating = False
On Error GoTo MyErrorTrap
Range("a1:g14").Clear
MyInput = InputBox("Type in Month and year for Calendar ")
If MyInput = "" Then Exit Sub
StartDay = DateValue(MyInput)
If Day(StartDay) <> 1 Then
StartDay = DateValue(Month(StartDay) & "/1/" & _
Year(StartDay))
End If
Range("a1").NumberFormat = "mmmm yyyy"
With Range("a1:g1")
.HorizontalAlignment = xlCenterAcrossSelection
.VerticalAlignment = xlCenter
.Font.Size = 18
.Font.Bold = True
.RowHeight = 35
End With
With Range("a2:g2")
.ColumnWidth = 11
.VerticalAlignment = xlCenter
.HorizontalAlignment = xlCenter
.VerticalAlignment = xlCenter
.Orientation = xlHorizontal
.Font.Size = 12
.Font.Bold = True
.RowHeight = 20
End With
Range("a2") = "Sunday"
Range("b2") = "Monday"
Range("c2") = "Tuesday"
Range("d2") = "Wednesday"
Range("e2") = "Thursday"
Range("f2") = "Friday"
Range("g2") = "Saturday"
With Range("a3:g8")
.HorizontalAlignment = xlRight
.VerticalAlignment = xlTop
.Font.Size = 18
.Font.Bold = True
.RowHeight = 21
End With
Range("a1").Value = Application.Text(MyInput, "mmmm yyyy")
DayofWeek = Weekday(StartDay)
CurYear = Year(StartDay)
CurMonth = Month(StartDay)
FinalDay = DateSerial(CurYear, CurMonth + 1, 1)
Select Case DayofWeek
Case 1
Range("a3").Value = 1
Case 2
Range("b3").Value = 1
Case 3
Range("c3").Value = 1
Case 4
Range("d3").Value = 1
Case 5
Range("e3").Value = 1
Case 6
Range("f3").Value = 1
Case 7
Range("g3").Value = 1
End Select
For Each cell In Range("a3:g8")
RowCell = cell.Row
ColCell = cell.Column
If cell.Column = 1 And cell.Row = 3 Then
ElseIf cell.Column <> 1 Then
If cell.Offset(0, -1).Value >= 1 Then
cell.Value = cell.Offset(0, -1).Value + 1
If cell.Value > (FinalDay - StartDay) Then
cell.Value = ""
Exit For
End If
End If
ElseIf cell.Row > 3 And cell.Column = 1 Then
cell.Value = cell.Offset(-1, 6).Value + 1
If cell.Value > (FinalDay - StartDay) Then
cell.Value = ""
Exit For
End If
End If
Next
For x = 0 To 5
Range("A4").Offset(x * 2, 0).EntireRow.Insert
With Range("A4:G4").Offset(x * 2, 0)
.RowHeight = 65
.HorizontalAlignment = xlCenter
.VerticalAlignment = xlTop
.WrapText = True
.Font.Size = 10
.Font.Bold = False
.Locked = False
End With
With Range("A3").Offset(x * 2, 0).Resize(2, _
7).Borders(xlLeft)
.Weight = xlThick
.ColorIndex = xlAutomatic
End With
With Range("A3").Offset(x * 2, 0).Resize(2, _
7).Borders(xlRight)
.Weight = xlThick
.ColorIndex = xlAutomatic
End With
Range("A3").Offset(x * 2, 0).Resize(2, 7).BorderAround _
Weight:=xlThick, ColorIndex:=xlAutomatic
Next
If Range("A13").Value = "" Then Range("A13").Offset(0, 0) _
.Resize(2, 8).EntireRow.Delete
ActiveWindow.DisplayGridlines = False
ActiveSheet.Protect DrawingObjects:=True, Contents:=True, _
Scenarios:=True
ActiveWindow.WindowState = xlMaximized
ActiveWindow.ScrollRow = 1
Application.ScreenUpdating = True
Exit Sub
MyErrorTrap:
MsgBox "You may not have entered your Month and Year correctly." _
& Chr(13) & "Spell the Month correctly" _
& " (or use 3 letter abbreviation)" _
& Chr(13) & "and 4 digits for the Year"
MyInput = InputBox("Type in Month and year for Calendar")
If MyInput = "" Then Exit Sub
Resume
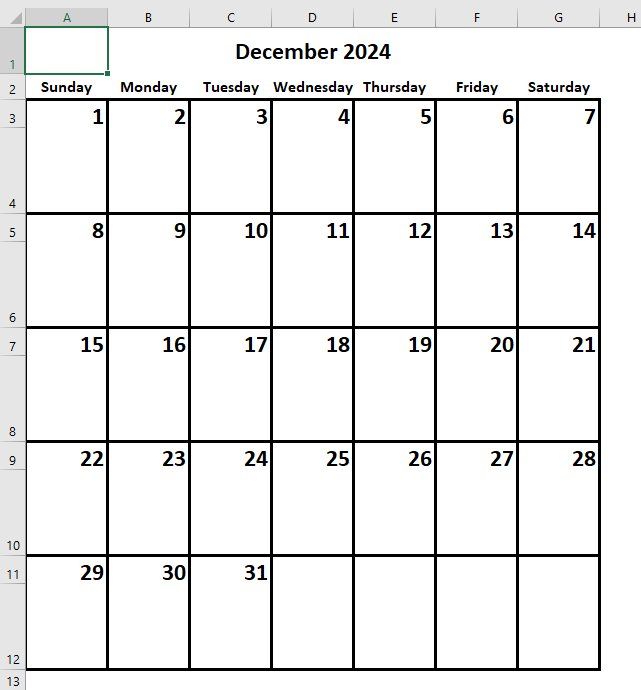
End Sub 3。次に、「実行」ボタンをクリックするか、「F5」キーを押してアプリケーションを実行してください。すると、プロンプトボックスが表示されるので、空欄に月と年を入力してください。

結果
関連記事
Excel でドロップダウンリスト式カレンダー(日付ピッカー)を作成する方法は?
Excel ワークシートにドロップダウン式のカレンダーを設置すれば、手入力せずに特定の日付をサッと選べます!このチュートリアルでは、ActiveX コントロールを使ってExcel ワークシートにカレンダーを簡単に作成する方法をご紹介します。
Excel で特定のセルをクリックしたときにカレンダーをポップアップさせる方法は?
この記事では、指定した範囲内のセルをクリックするとカレンダーがポップアップし、選択した日付が自動的にそのセルに挿入される方法をご紹介します。
Excel シートからOutlook カレンダーに予定を作成する方法は?
場合によっては、Outlook カレンダーに予定を登録する必要があるかもしれません。でも、次のようにExcel ワークシートに予定を一覧で整理し、それをOutlook カレンダーにインポートしたことはありますか?
Excel で動的な月間カレンダーを作成する方法は?
この記事では、Excel で簡単に使える動的な月間カレンダーの作り方を詳しく解説します。
最高の Office 業務効率化ツール
Kutools for Excel – あなたを群衆の中から際立たせます
| 🤖 | KUTOOLS AI アシスト:次に基づいてデータ分析を革新します:インテリジェント実行 | コード生成| カスタム数式作成 | データ分析とチャート生成| 拡張機能呼び出し… |
| 人気の機能:検索、ハイライト、または重複をマーキング | 空白行を削除する | データを失うことなく列の結合またはセルを | 数式を使用しない四捨五入... | |
| スーパー VLookup:複数条件 | 複数値 | 複数シート間 | ファジーマッチ... | |
| 高度なドロップダウンリスト:簡単なドロップダウンリスト | 連動型ドロップダウンリスト | 複数選択可能なドロップダウンリスト... | |
| 列マネージャー:指定した数の列を追加 | 列の移動 | 非表示列の表示状態を切り替え |列を比較して同じ/異なるセルを選択... | |
| 注目の機能:グリッドフォーカス | デザインビュー | 強化された数式バー | ワークブックとシートマネージャー|リソースライブラリ(オートテキスト)| 日付ピッカー | ワークシートの統合 | 暗号化/セルの復号化 | リストからメール送信 | スーパーフィルター | 特殊フィルタ(太字のフォントを持つセルをフィルタリング/斜体/取り消し線。。。) 。。。 | |
| トップ15 ツールセット:12 テキストツール(テキストの追加、特定の文字を削除...)| 50+チャートタイプ(ガントチャート...)| 40+実用的関数(誕生日に基づいて年齢を計算します...)| 19 挿入ツール(QR コードを挿入、パスから画像を挿入...)| 12 変換ツール(単語に変換する、為替レートの変換...)| 7 結合と分割ツール(高度な行のマージ、Excel セルを分割...)|。。。他にも多数 |
Kutools for Excel は300 以上の機能を備えており、必要な機能が常にワンクリックで利用できるようになっています。。。
Office Tab – Microsoft Office(Excel を含む)でタブを使った閲覧・編集を可能にします
- 開いている数十ものドキュメントを1 秒でサッと切り替えられます!
- 毎日何百回ものマウスクリックを削減して、マウス手首症候群ともさよならしましょう。
- 複数のドキュメントを閲覧・編集中、生産性が50%向上します。
- Office(Excel を含む)に、Chrome ・Edge ・Firefox のような使いやすさで効率的なタブ機能をもたらします。