Outlook でアカウントを削除しても、そのメールを保持する方法は?
Microsoft Outlook に複数のメールアカウントを設定しているものの、そのうちいくつかはほとんど使っていない——そんな状況を想像してみてください。こうした使用頻度の低いアカウントを削除することも選択肢の一つでしょう。通常、Microsoft Outlook からメールアカウントを削除すると、そのアカウントに関連するメールも同時に失われてしまいます。しかし、本記事では、Microsoft Outlook からメールアカウントを削除しつつ、大切なメッセージを確実に保持するためのさまざまな方法をご紹介します。
元のデータファイルを保存してアカウントを削除してもメールを保持する
この方法では、Microsoft Outlook からメールアカウントを削除しても、そのアカウントのすべてのアイテムを Outlook 内にそのまま保持できます。
重要なお知らせ:この手順は、.pst データファイルを使用するメールアカウント向けに設計されています。アカウントが.ost ファイルで動作している場合は、.pst 形式に変換・エクスポートする必要があります。このステップは、アカウント削除時にメールデータを失わないために非常に重要です。
- 「ファイル」>「情報」>「アカウント設定」>「アカウント設定」をクリックして、「アカウント設定」ダイアログボックスを開きます。

- 「アカウント設定」ダイアログボックスの「メール」タブで、以下の手順を実行してください。
- 削除するメールアカウントを選択してください。 選択したアカウントが.pst データファイルに関連付けられていることを必ず確認してください。.ost ファイルにリンクされている場合、アカウントを削除するとすべてのメールが失われるおそれがあります。
- 「削除」ボタンをクリックしてください。
- 下部の「閉じる」ボタンをクリックして、ダイアログボックスを閉じます。

- これでOutlook のメイン画面に戻ります。「ファイル」>「開くとエクスポート」>「Outlook データファイルを開く」をクリックしてください。
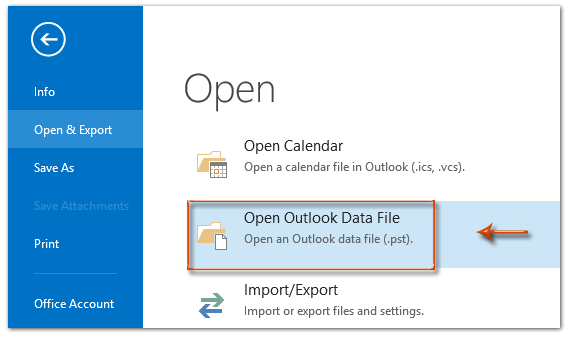
- 表示された「Outlook データファイルを開く」ウィンドウで、アクセスしたいデータファイルの場所を特定し、選択して「開く」ボタンをクリックしてください。 ヒント:.pst ファイルが既定以外の場所に保存されている場合は、該当するフォルダーに移動して、その.pst ファイルを開いてください。


結果
メールアカウントは Microsoft Outlook から削除されましたが、そのアカウントに関連付けられたフォルダーは引き続きナビゲーションに表示され、アクセス可能です。
Outlook の AI メールアシスタント:ワンクリックで魔法のように、よりスマートな返信と明確なコミュニケーションを実現!
Kutools for Outlook の AI メールアシスタントで、日々のOutlook タスクをもっと効率的に。この強力なツールは過去のメールから学習し、的確で知的な返信を提案したり、メールの内容を最適化したり、メッセージの下書きや修正を簡単にサポートします。

この機能は以下のサポートを提供します:
- スマート返信:過去の会話に基づき、カスタマイズされ、正確で即使用可能な返信を取得できます。
- コンテンツ強化:メール本文を自動で明確かつ効果的な内容にブラッシュアップします。
- 簡単作成:キーワードを入力するだけで、AI が複数の書式スタイルで残りの作業を自動処理します。
- インテリジェント拡張:文脈を的確に捉えた提案であなたのアイデアをさらに広げます。
- 要約機能:長いメールを瞬時に簡潔な概要にまとめてくれます。
- グローバル対応:メールをあらゆる言語に簡単に翻訳できます。
この機能は以下のサポートを提供します:
- スマートメール返信
- 最適化されたコンテンツ
- キーワードベースの下書き
- インテリジェントなコンテンツ拡張
- メール要約
- 多言語翻訳
コピー&ペーストでアカウントを削除してもメールを保持する
実際、Microsoft Outlook からメールアカウントを削除する前に、手動でコピー&ペースト操作を使ってすべてのメールを別のフォルダーに保存できます。以下の手順で詳しくご案内します。
- 削除予定のアカウントに紐付くナビゲーションから、保存したいメールが含まれるメールフォルダーを開きます。

- 「Ctrl + A」を押して、「フォルダーを開く」内のすべてのメールを選択します。
- 「Ctrl + C」を押して、これらのメールメッセージをコピーしてください。
- これらのメールを転送先のフォルダーに移動します。例として、別のメールアカウントの受信トレイを開いてみましょう(下図参照)。

- 「Ctrl + V」を押して、コピーしたすべてのメールメッセージをこのフォルダーに貼り付けます。ヒント:
- ステップ1 から5 を繰り返し、削除するアカウントの他のフォルダーからメールメッセージを移動してください。
- この方法ではサブフォルダーは含まれません。サブフォルダー内のメールを処理するには、各サブフォルダーごとにステップ1~5 を繰り返す必要があります。
- 「ファイル」>「情報」>「アカウント設定」>「アカウント設定」をクリックして、「アカウント設定」ダイアログボックスを開きます。
- 「アカウント設定」ダイアログボックスの「メール」タブで、次の手順を実行してください。
- 削除したいメールアカウントを選択してください。
- 「削除」ボタンをクリックしてください。
- 下部の「閉じる」ボタンをクリックして、ダイアログボックスを閉じます。


アカウント削除前にメールを PST ファイルにエクスポートする
Outlook で削除するアカウントのメールを確実に保持したい場合は、PST(Outlook データファイル)としてエクスポートするのがおすすめです。この方法でメールのバックアップが作成され、アカウントを削除した後もいつでもアクセスできます。手順は次のとおりです。
- 「ファイル」>「開くとエクスポート」>「インポート/エクスポート」をクリックして、「インポートとエクスポート ウィザード」ダイアログ ボックスを開きます。
- ウィザードで「ファイルにエクスポートする」を選択し、「次へ」をクリックしてください。

- 「ファイルにエクスポート」ダイアログボックスで、「Outlook データファイル(。pst)」を選択して、「次へ」をクリックしてください。

- 「Outlook データファイルのエクスポート」ダイアログボックスで、後ほど削除するメールアカウントを選択し、「サブフォルダーを含む」にチェックが入っていることを確認して、「次へ」をクリックします。

- エクスポートパラメーターを次のように設定してください。
- 「参照」をクリックしてフォルダーを選択し、PST ファイルの保存先を指定したうえで、ファイル名を入力してください。
- 「重複アイテムをエクスポートしない」オプションを選択してください。
- 「完了」をクリックしてください。

- 「Outlook データファイルの作成」ダイアログが表示されます。
- パスワードを追加するには、「パスワード」と「パスワードの確認」の両方のボックスに同じパスワードを入力し、「OK」をクリックしてください。
- パスワードの追加をスキップするには、「キャンセル」をクリックしてください。


上記の手順を完了したら、最初の方法で説明した手順を実行すれば、既存のメールアカウントを削除しつつ、元のメールを保持できます。
最高の Office 生産性ツール
まったく新しいKutools for Outlook を、100 以上の驚きの機能とともに体験しましょう!今すぐダウンロード!
🤖KUTOOLS AI:高度な AI 技術を活用して、メールの返信、要約、最適化、拡張、翻訳、作成など、あらゆる操作をラクラクこなします。
📧メール自動化:自動返信(POP および IMAP 対応)/メールのスケジュール送信/メール送信時にルールに基づいて自動 CC/BCC/自動転送(高度なルール)/自動で挨拶文を追加/複数の宛先を持つメールを個別のメッセージに自動分割...
📨メール管理:メールの取り消し/件名などを基準に詐欺メールをブロック/重複したメールを削除/高度な検索/フォルダーを整理...
📁添付ファイルプロ:一括保存/一括分離/一括圧縮/自動保存/自動的に切り離す/自動圧縮...
🌟インターフェースの魅力:😊さらに美しくクールな絵文字を多数収録/重要なメールが届いた際に通知/Outlook を閉じる代わりに最小化...
👍ワンクリックの驚き:全員に【Attachment】付きで返信/フィッシングメール対策/🕘送信者の現在時刻ゾーンを表示...
👩🏼🤝👩🏻連絡先とカレンダー:選択したメールから連絡先を追加を一括登録/連絡先グループを個別のグループに分割/誕生日のリマインダーを削除...
Kutools はお好みの言語でお使いいただけます!英語、スペイン語、ドイツ語、フランス語、中国語をはじめ、40 以上の言語をサポートしています!
ワンクリックでKutools for Outlook の機能を即解放!今すぐダウンロードして、効率を飛躍的にアップさせましょう!


🚀 ワンクリックダウンロード — Office アドインをすべて入手
強く推奨:Kutools for Office(5-in-1)
ワンクリックで5 つのインストーラーを 一括ダウンロード! ―Kutools for Excel、Outlook、Word、PowerPointおよびOffice Tab Pro。今すぐダウンロード!
- ✅ワンクリックで簡単操作:5 つのセットアップパッケージをたった1 回のクリックで一括ダウンロードできます。
- 🚀どんな Office 作業にも対応可能:必要なときに、必要なアドインをすぐインストールできます。
- 🧰含まれるもの:Kutools for Excel / Kutools for Outlook / Kutools for Word / Office Tab Pro / Kutools for PowerPoint