Outlook でメールリストの送信者のドメインを表示するにはどうすればよいですか?
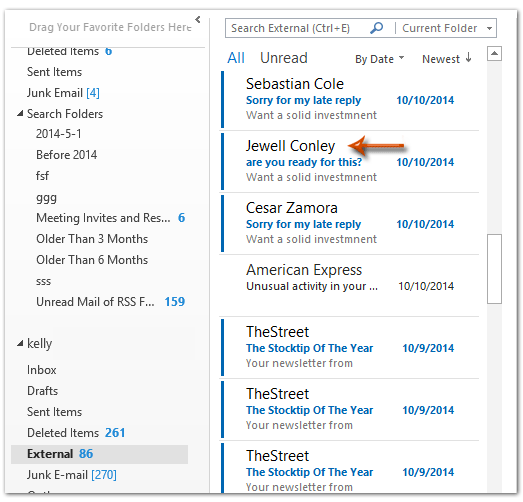
Outlook をご利用の際、下のスクリーンショットのように、表示名だけでは送信者の身元がはっきりと分からない見知らぬ相手からのメールを時折受信することがあります。多くのユーザーにとって、迷惑メールやフィッシング詐欺、あるいは外部組織からのメッセージを識別するため、メールを開く前に送信者のメールドメインを確認することが重要です。メールリスト内で直接ドメインが確認できれば、どのメールを優先的に処理すべきか、またどのメールに注意を払うべきかをより的確に判断できます。本記事では、Microsoft Outlook のメールリストで送信者のメールドメインを直接表示するための実用的な方法をいくつかご紹介します。これにより、メール管理の効率とセキュリティ意識がさらに高まります。
新しい列を追加してメールリストで送信者のドメインを表示
以下に、Outlook のメールリストで送信者のメールドメインを表示するための詳しい手順と代替ソリューションをご紹介します。
まず、送信者のメールドメインでフィルタリングする列を表示または追加したいメールフォルダー内にいることを確認してください。この方法は、外部メールのスクリーニングや特定の組織からのメールのフィルタリングに最適です。また、メールの並べ替えと可視性を向上させ、生産性を高めたい場合にも特に役立ちます。ただし、この設定は選択したフォルダーのビューのみに適用されることにご注意ください。他のフォルダーには、同様の調整を個別に適用するまで変更は反映されません。
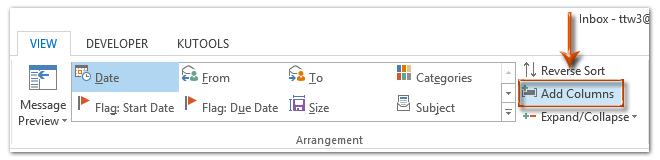
Outlook のリボンで、表示タブに移動し、複数の列を追加ボタンをクリックすると、メールリストに表示される内容をカスタマイズするオプションが開きます。複数のメールアカウントやアーカイブをご利用の場合は、常に正しいフォルダーが選択されていることをご確認ください。
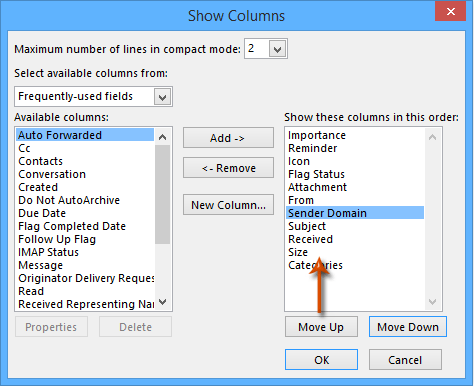
次のステップとして、送信者のメールアドレスからドメイン部分を抽出・表示するための新しいカスタム列を追加します。「列の表示」(または「フィールドの表示」)ダイアログボックスで、新しい列(場合によっては)新しいフィールドと表示される)ボタンを見つけ、クリックします。Show Columns(または)Show Fields)ダイアログボックス。
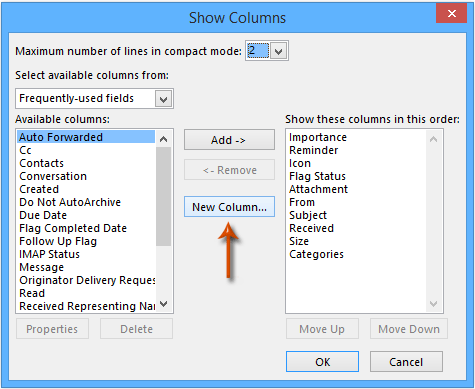
「新しい列」(または「新しいフィールド」)ダイアログボックスで:新しい列(または)新しいフィールド)
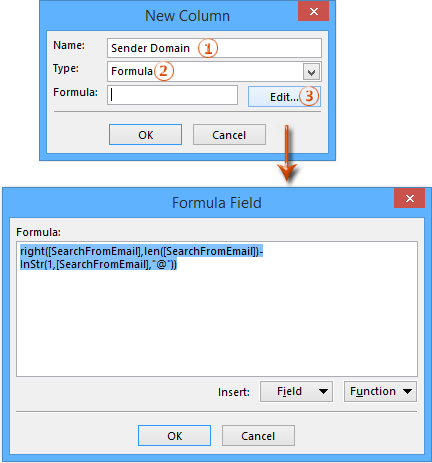
- 「名前」ボックスに「送信者のメールドメインでフィルタリング」など、わかりやすく覚えやすい名前を入力して、後から簡単に識別できるようにしてください。
- 「種類」ボックスでドロップダウンメニューから「数式」を選択してください。「数式」を選択すると、送信者のメールアドレス全体からドメイン部分のみを抽出・表示できます。
- 「編集」をクリックし、ドメイン部分を抽出する数式を入力してください。以下のテキストを数式ボックスに正確に入力しましょう:
right([SearchFromEmail],len([SearchFromEmail])-InStr(1,[SearchFromEmail],「@」))
この数式は、送信者のメールアドレスの「@」以降の部分を抽出する仕組みです。組織でカスタム条件名を使用している場合は数式を調整できますが、ほとんどのユーザーにとっては「[SearchFromEmail]」が送信者の完全なメールアドレスを正確に取得します。
「OK」をクリックして数式を保存し、再度「OK」をクリックしてダイアログボックスを閉じてください。Outlook が数式の使用について確認を求めた場合は、メッセージをよく確認し、構文が正しく入力されていることをご確認ください。特に数式内のスペースやタイポに注意してください。これらが原因で、列に誤った情報が表示されたり、空白のままになったりする可能性があります。
次に、「列の表示」(または「フィールドの表示」)ダイアログに戻り、「この順序で次の列を表示」リストから新たに作成したカスタム列を探します。使いやすさを考慮し、カスタム列「送信者のメールドメインでフィルタリング」を「差出人」フィールドの直下に配置することで、送信者の表示名と視覚的に対応させ、ドメインの識別をより迅速かつ便利に行えるようにします。
「OK」をクリックして、変更を適用・確定してください。以前の設定を上書きするかどうか確認された場合は、構成に問題がなければ「はい」を選択してください。
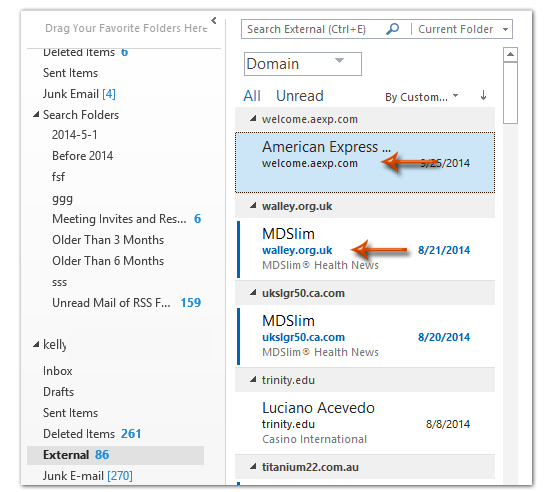
これにより、メールリスト上で各送信者のメールドメインが表示名の下に表示されるようになり、メッセージの送信元を一目で簡単に識別できるようになります。この機能は、社内と社外の連絡先を明確に区別したり、見慣れないドメインを素早く見つけたり、ワークフローの改善のためにコミュニケーションを効果的に整理したりするのに特に役立ちます。参考までに、以下の例をご覧ください。
複数のフォルダーやメールボックス間で一貫したビューを維持したい場合は、カスタムレイアウトを保存することをおすすめします。Outlook でビュー設定を保存し、他のフォルダーにコピーする方法は?をご参照ください。ビューを保存すれば、フォルダーのリセットやOutlook の更新によって設定が意図せず失われることを防げます。
実用的なヒントと注意点:
- 新しく追加した列に送信元メールアドレスフィールドが空白になったり、誤った情報が表示される場合は、数式や条件名を再度ご確認ください。Outlook の言語パックやアップデートによって、フィールドラベルが変更される場合があります。
- この方法は標準的なメールフォルダーでは正常に機能しますが、検索フォルダーや会話ビューなどの特殊なフォルダーでは、列のカスタマイズや高度な数式フィールドが完全にはサポートされないことがあります。
- ドメイン分析をさらに強化したい場合は、メールリストを送信者のドメインでグループ化または並べ替えてみてください。詳しくは、Outlook で送信者のメールドメインでフィルタリングで並べ替え・グループ化する方法は?をご参照ください。
- 「数式エラー」が発生したり、ドメインが正しく抽出されない場合は、非標準のメールアドレスや「@」記号を含まない表示名が含まれていないかご確認ください。このようなケースでは、数式が正しく処理できません。
- この方法で行った変更は、現在使用中のOutlook クライアントにローカルに保存されます。複数のコンピューターまたはOutlook Web Access をご利用の場合は、ビュー設定を再度適用する必要があります。
VBA コードを使用してメールリストで送信者のドメインを表示
別の方法として、Outlook のバージョンや構成がカスタム数式列をサポートしていない場合や、即座にドメインを確認したい場合には、VBA コードを使ってOutlook 内で選択した送信者のメールドメインを表示できます。この方法には、Outlook VBA エディターの基本的な操作知識が必要です。
- 送信者のドメインを確認したいメールアイテムを選択します。
- Alt + F11 キーを押して、Microsoft Visual Basic for Applications ウィンドウを開きます。
- VBA エディターウィンドウで、挿入 > 標準モジュールをクリックしてください。以下の VBA コードをモジュールにコピー&ペーストしましょう:
VBA コード:選択したメールの送信者のメールドメインを表示
Sub ShowSenderDomain()
    Dim xMail As Outlook.MailItem
    Dim xItem As Object
    Dim xDomain As String
    Dim xEmail As String
    On Error Resume Next
    xTitleId = "KutoolsforOutlook"
    Set xItem = Outlook.Application.ActiveExplorer.Selection.Item(1)
    If xItem.Class <> olMail Then
        MsgBox "Please select a mail item!", vbExclamation, "KutoolsforOutlook"
        Exit Sub
    End If
    Set xMail = xItem
    xEmail = xMail.SenderEmailAddress
    If InStr(xEmail, "@") > 0 Then
        xDomain = Right(xEmail, Len(xEmail) - InStr(1, xEmail, "@"))
        MsgBox "Sender Domain: " & xDomain, vbInformation, "KutoolsforOutlook"
    Else
        MsgBox "Unable to determine sender domain.", vbExclamation, "KutoolsforOutlook"
    End If
    Set xMail = Nothing
    Set xItem = Nothing
End Sub- F5キーを押してコードを実行します。選択したメッセージの送信者のメールドメインを表示するKutools for Outlook ダイアログが開きます。
コードを実行する前に、必ずメールを先に選択してください。この VBA 方式は一時的な確認に素早く対応できますが、前述のカスタム数式方式のようにメールリストビュー内に永続的なドメイン列を提供するものではありません。
まとめると、Outlook で送信者のメールドメインを表示することは、セキュリティ面と整理面で実用的なメリットをもたらします。数式ベースの列方式は日常業務の効率化に適しており、VBA 方式は一時的な確認やトラブルシューティングに最適です。継続的な問題が発生する場合は、Outlook のバージョンがカスタム列に対応しているかを確認し、常にビュー設定を保存してください。これらのツールとオプションにより、Outlook でのメールコミュニケーションに対するコントロールと可視性が向上します。
関連記事
Outlook で送信者のメールドメインに基づいてフィルタリングし、並べ替えやグループ化を行うにはどうすればよいですか?
Outlook で VBA コードを使用して送信者のメールドメインでフィルタリングを表示
最高の Office 生産性ツール
まったく新しいKutools for Outlook を、100 以上の驚きの機能とともに体験しましょう!今すぐダウンロード!
🤖KUTOOLS AI:高度な AI 技術を活用して、メールの返信、要約、最適化、拡張、翻訳、作成など、あらゆる操作をラクラクこなします。
📧メール自動化:自動返信(POP および IMAP 対応)/メールのスケジュール送信/メール送信時にルールに基づいて自動 CC/BCC/自動転送(高度なルール)/自動で挨拶文を追加/複数の宛先を持つメールを個別のメッセージに自動分割...
📨メール管理:メールの取り消し/件名などを基準に詐欺メールをブロック/重複したメールを削除/高度な検索/フォルダーを整理...
📁添付ファイルプロ:一括保存/一括分離/一括圧縮/自動保存/自動的に切り離す/自動圧縮...
🌟インターフェースの魅力:😊さらに美しくクールな絵文字を多数収録/重要なメールが届いた際に通知/Outlook を閉じる代わりに最小化...
👍ワンクリックの驚き:全員に【Attachment】付きで返信/フィッシングメール対策/🕘送信者の現在時刻ゾーンを表示...
👩🏼🤝👩🏻連絡先とカレンダー:選択したメールから連絡先を追加を一括登録/連絡先グループを個別のグループに分割/誕生日のリマインダーを削除...
Kutools はお好みの言語でお使いいただけます!英語、スペイン語、ドイツ語、フランス語、中国語をはじめ、40 以上の言語をサポートしています!
ワンクリックでKutools for Outlook の機能を即解放!今すぐダウンロードして、効率を飛躍的にアップさせましょう!


🚀 ワンクリックダウンロード — Office アドインをすべて入手
強く推奨:Kutools for Office(5-in-1)
ワンクリックで5 つのインストーラーを 一括ダウンロード! ―Kutools for Excel、Outlook、Word、PowerPointおよびOffice Tab Pro。今すぐダウンロード!
- ✅ワンクリックで簡単操作:5 つのセットアップパッケージをたった1 回のクリックで一括ダウンロードできます。
- 🚀どんな Office 作業にも対応可能:必要なときに、必要なアドインをすぐインストールできます。
- 🧰含まれるもの:Kutools for Excel / Kutools for Outlook / Kutools for Word / Office Tab Pro / Kutools for PowerPoint